

 |
| All American canner |
A big thanks to those taking our survey on what you would like to see coming up on our blog - the winner for September was canning meat..... so here we go!! (Feel free to leave other topic suggestions in our comments section or via email!)

* Meat HAS to be canned in a pressure canner cooker with a gauge that shows the pounds of pressure in the canner, as opposed to a water bath canner.
* Ground meat of any kind needs to be cooked before it is canned, and needs water added to the ground meat for the canning process.
* It is advised that you use new jars or jars that you know the history of as opposed to jars that are 'recycled' from garage sales, etc. We were surprised that we did not see a major inconvenience using regular mouth jars as opposed to wide mouth jars for canning meat.
* Pint jars hold approximately 1 pound of meat, quart jars hold approximately 2 pounds of meat.
 1. Put about 3 inches of water in the bottom of your pressure canner cooker and put the heat on high, WITHOUT THE LID ON, to begin heating the canner. This is a multi-tasking tip that will save about 30 minutes of pre-heating time.
2. Start boiling a small pan of water to warm the lids in. Put the lids in about 2 minutes before you are ready to use them - if they are heated too long the wax on the seal can be compromised.
4. Add 1/4 - 1/2 tsp salt to each jar. DO NOT add other spices.
5. Wipe the rim of the jar with a clean towel to make sure it is clean and dry so it can make a good seal. (This is probably a good time to prep your lids - turn off the heat once the water is boiling and put the lids in for about 2 minutes.)
 6. Put the lids on the jars being careful not to touch the underside of the lid. Screw a ring onto the jar making it finger tight. "What is finger tight", you say? Screw the lid on tight, then unscrew it slightly, maybe 1/4 turn, so that the air can escape during the canning process.
7. Place the jars into the canner, staggering the top and bottom layers. By now, if you started your water in the beginning, it is boiling (yeah!). We were worried it would crack the jars, but did not have any trouble with that. If you did not pre-heat your water, just make sure you put the water in the canner BEFORE the jars. Also, even if you will only be canning 1 layer of jars, ALWAYS use the rack to keep the jars from being in contact with the bottom of the cooker. If canning 2 layers of jars, place a second rack between the first and second layer of jars.
8. We used a metal-to-metal canner for this project, meaning there is no rubber gasket between the cooker and the lid. For a metal-to-metal canner you will need to line the rim of the canner with petroleum to keep the lid from sticking and difficulty in removing it, to prevent scratching, and maintaining a steam tight seal, and damage overall.If you are using another type of canner, please read your canner's instructions for specific details for the gasket and sealing.
9. Put the lid on and tighten the wing nuts - specifically, tighten wing nuts on opposite sides at the same time (as in a star pattern), making sure the same size gap is maintained around the cooker. Think "finger tight", not Fort Knox :0) The wing nuts can be loosened to make them "taller" if it seems it is too short to reach over the lid. NEVER tighten one wing nut at a time. **If this is the first time using your pressure canner, you may want to do this without preheating the water, as it took us a few tries to get the hooks to line up right and figure out how to lengthen the wing nuts (newbies!!), having a hot pan may make for a painful learning curve.
10. Place the canner on full heat if you did not begin pre-heating in step one. The canner will heat the water to steaming, and the steam will "vent" from the pressure valve where the pressure regulator weight is. It is sometimes really hard to see this steam coming out, as it takes FOREVER it seems, so watch closely for it. This allows the air to come out of the jars. Vent for 7-10 minutes.
11.Place the pressure regulator weight on the pressure valve. **Check your altitude and your canner instructions for the appropriate weight and time for your canner**. For our high altitude location, we set the pressure regulator on 10 pounds.
12. The canner will continue to pressurize. Begin your cooking time from when the pressure regulator starts to "rock". This did not rock the way we expected - we were expecting it to rock the same as our smaller pressure cooker does (not canner) when we cook potatoes, etc., and it was more of a loud whistle and light jiggle. We were confused initially - while the pressure gauge shows a numeric value, it is not related to the pressure regulator weight (10lbs, in our case), so measure your cook time from the pressure regulator rocking, not what the pressure gauge needle says. Also, the temperature fluctuated a lot more than we thought - you will need to continually monitor the pressure and canner, making small adjustments for most of the timed cooking.
 |
| Just finished cooking. |
13. At the end of the cook time, simply turn off the heat. Allow the pressure canner to release the pressure on its own with time. Once the pressure gauge (the one with the needle) says there is no longer any pressure in the canner, unscrew the wing nuts (opposite sides at the same time again) and take off the lid.
14. Remove the jars (using a jar lifter - the jars will be HOT, the juices inside will be boiling), and set on top of the counter with a towel already on it. Choose a counter where there will be no drafts hitting it.
15. Using a hot pad, tighten the jars the rest of the way to help finish the sealing process. Remove the water from the canner.
16. Let set over night, or until cool.
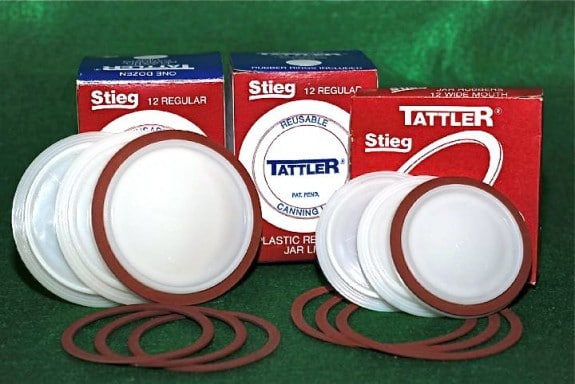
Tattler reusable canning lids. Are supposed to be awesome and easy peezy to use, were dying to try them...next time. Just in case you want to try them before we do here's the cheapest place we found them at. Not to mention there preparedness factor. Happy canning!
We have canned meat a whole three times now but we already feel very comfortable and confident with the whole process. And it feels great to be able to look at what we have accomplished. Not to mention that your canned meat will taste better then any canned meat you could buy from the grocery store...at least any that I have tasted. Now be confident and go can some meat!
 |
| We have hard water so to get rid of the this add about a tsp or so of vinegar to your canning water. |
No comments:
Post a Comment